# Scheme
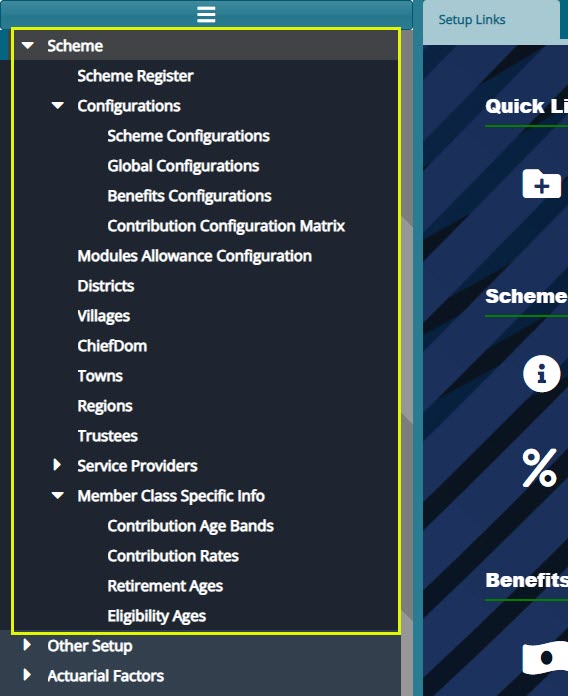
Access to all scheme configurations is provided for by clicking the 'Scheme' menu on the left side pane. This will open a dropdown menu which is organized into submenu categories, providing a convenient order of configurations. See screenshot below:
Action
- Click a link under the left side pane to open a dialog box through which a specific scheme setting can be configured.
# Scheme Register
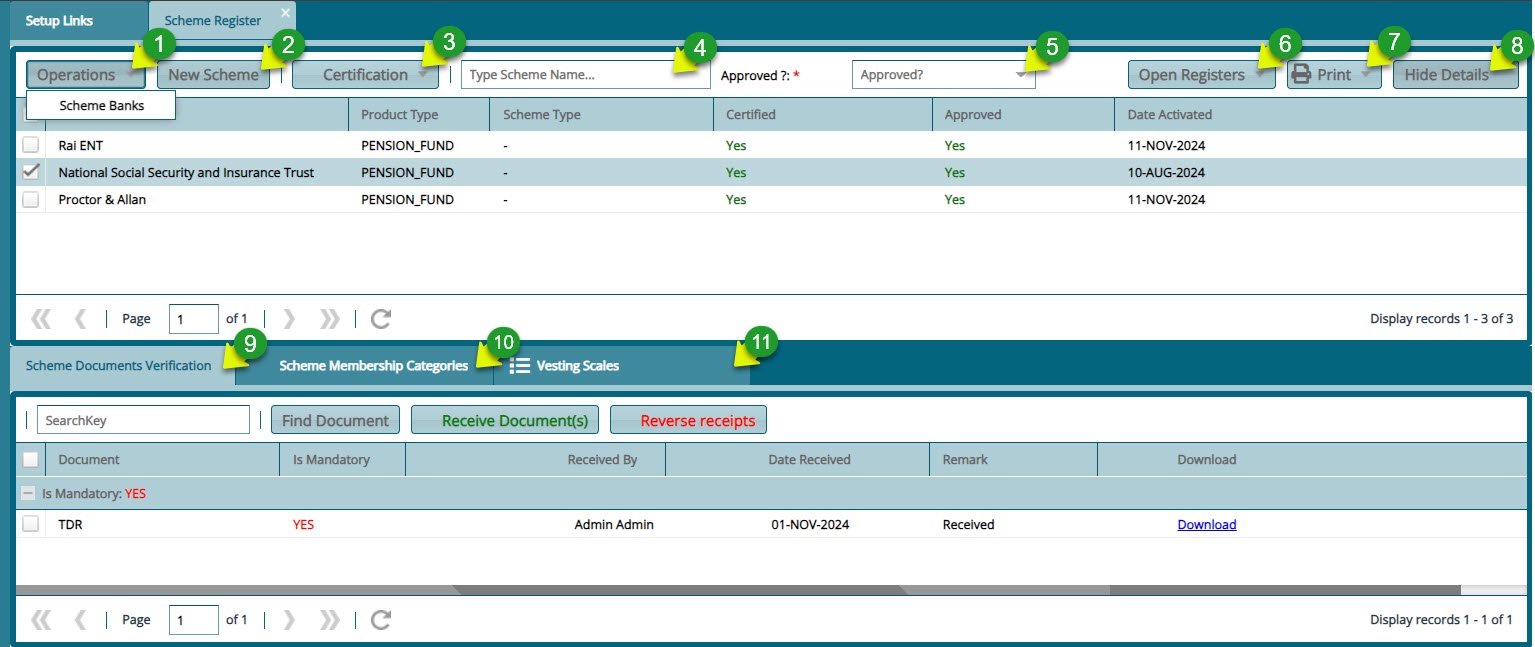
The 'Schemes Register' lists all the schemes created in the system. From the scheme window, several actions can be taken on selected schemes such as cloning of a scheme's configuration, certification, and migration of a scheme among others. From this window a new scheme can also be created. The screenshot below shows how the scheme register looks like:
Action
Click on the label 1 menu to open a drop-down list with actions for selected schemes.
Click on the label 2 button to launch a dialogue box for creating a new scheme.
Click on the label 3 menu to open a drop-down for certifying and approving selected schemes.
Click on the label 4 text field and enter keywords to filter records by name.
Click on the label 5 menu to open a drop-down to filter by approved or not approved records status.
Click on the label 6 menu to open a drop-down list of registers.
Click on the label 7 button to open a drop-dowm to access links to download scheme related reports.
Click on the label 8 button to show or hide the more detailed section of a selected schemerecord.
Click on the label 9 tab to upload scheme related documents.
Click on the label 10 tab to view categories of scheme memberships.
Click on the label 11 tab to view vesting scales deatils.
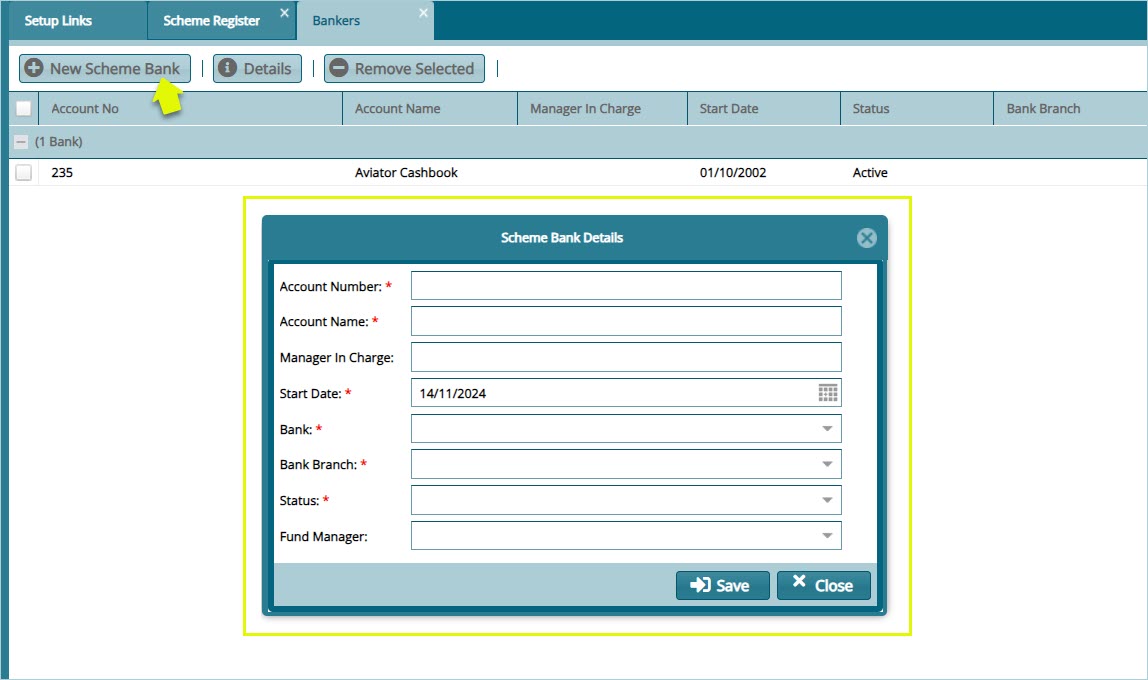
# Scheme Bank Details
The Operations menu provides a link to open a windows for capturing a scheme's bank details. See the screenshot below:
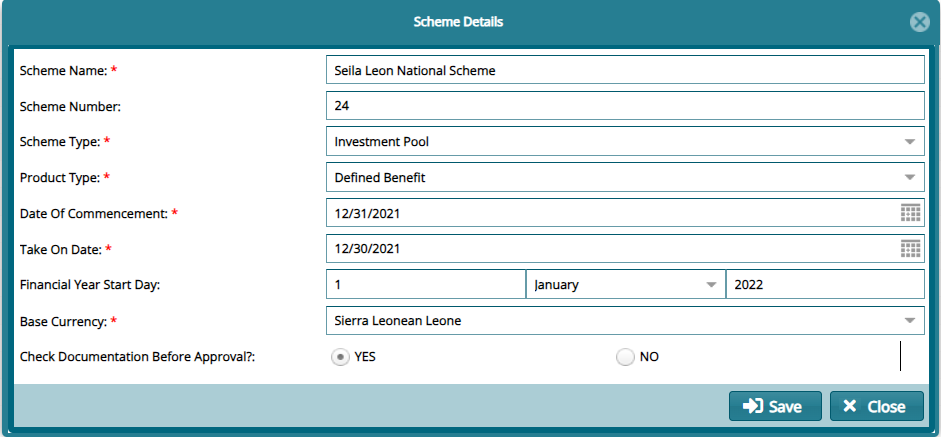
# New Scheme
To create a new scheme, click the 'New Scheme' button to launch the Scheme Details dialog box. In this dialog box, critical configurations can be set, as illustrated below:
Tips
- The 'Take On Date' is configured to determine the financial periods while the 'Date of Commencement' denotes the start of the scheme.
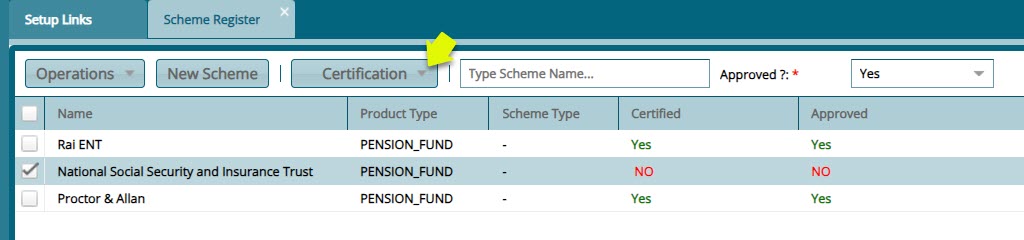
# Scheme Certification
The 'Certification' menu provides access to the buttons through which a newly created scheme is certified and approved before further configurations can be done. See screenshot below:
Action
- To Certify or Approve a scheme, select it from the scheme register grid table. From the 'Certification' drop-down menu, select 'Certify' or 'Approve' menu links and click.
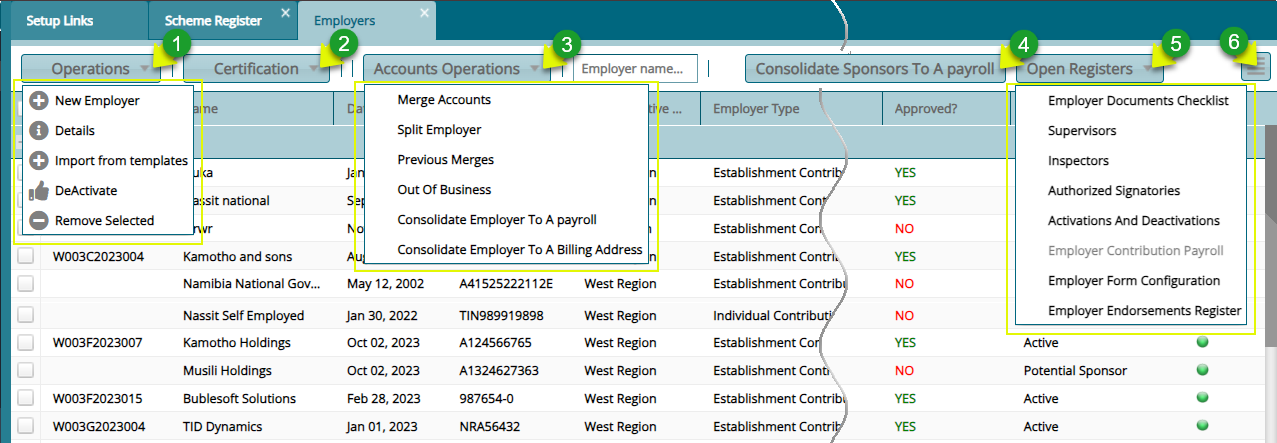
# Employer Enrollment Activities
The Employer Window comes with a detailed menu bar from which a number of activities can be initiated in relation to employer creation. See the screenshot below:
Action
Click on the label 1 button and from the drop-down select an option to initiate a process such as adding a new employer.
Click on the label 2 button and from the drop-down menu select the option to certify and approve the registration of a newly added employer.
Click on the label 3 button and from the drop-down list select to merge employer accounts among other accounts related actions.
Click on the label 4 button push all the employers under a selected employer into a payroll.
Click on the label 5 menu to select an option such as initiating the inspection process.
click on the label 6 icon to open a section showing extra details for a selected employer.
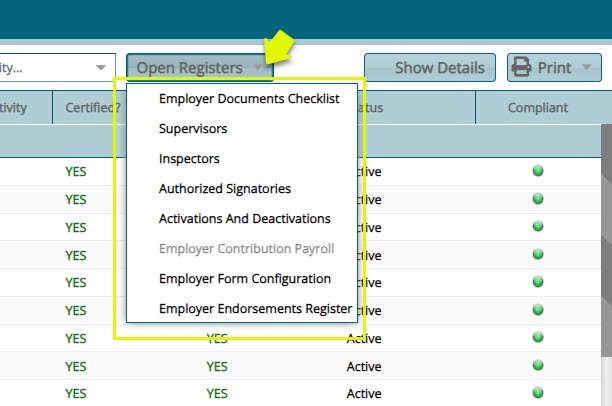
# Open Registers
The 'Open Register' menu offers links to open windows displaying various basic registers related to schemes. These registers may include information such as employer details and billing addresses. See the screenshot below:
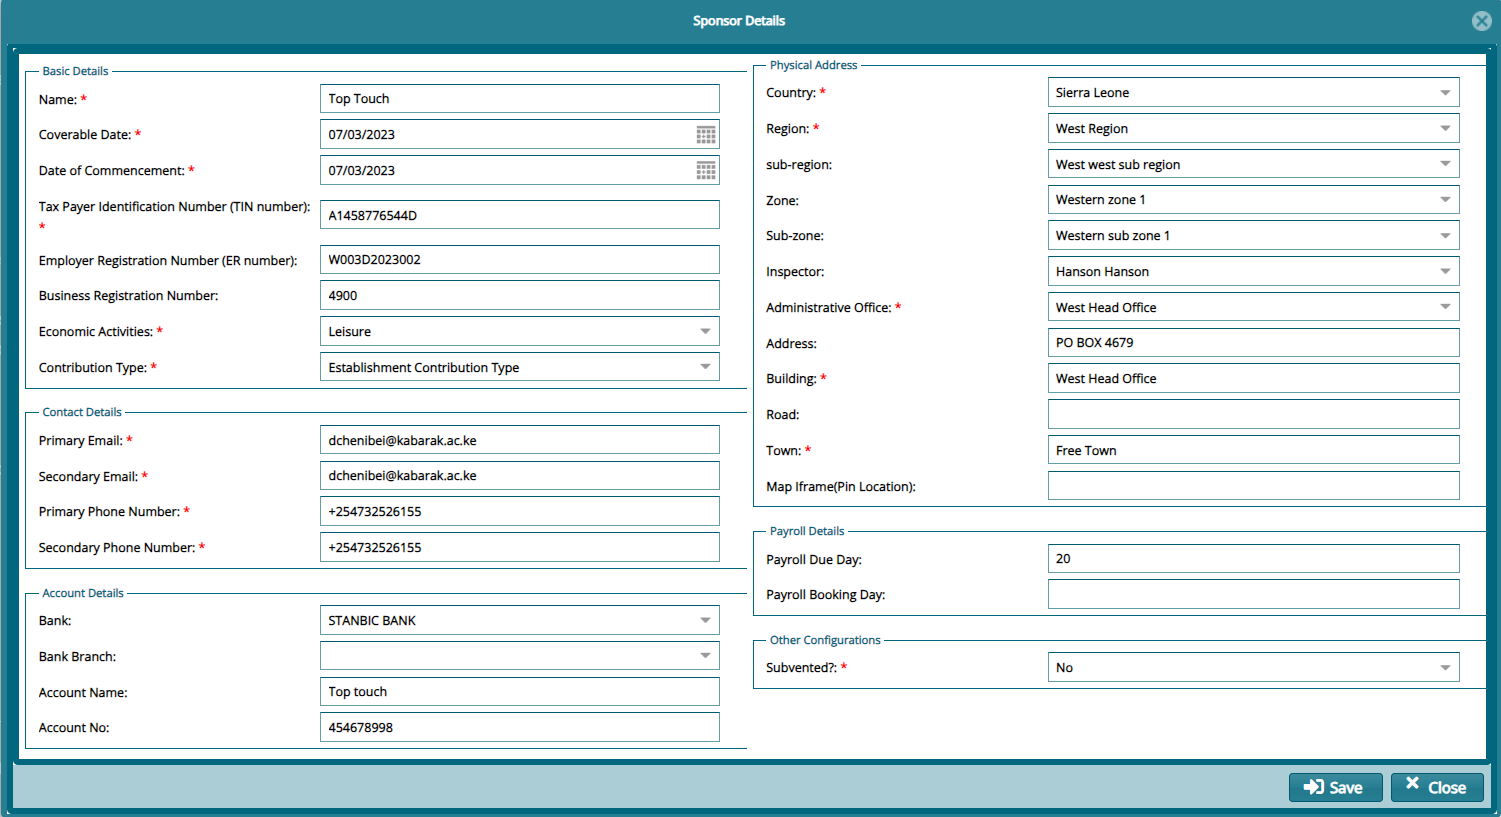
# Onboarding an Employer
To enroll a new employer into a scheme, locate the 'Operations' drop-down menu and Click the 'New Employer' link to open a form where the details of a new employer are captured into the system as shown below:
Clicking the 'Save' button on the employer details form upon completion of capturing the details will load a form for scheduling a meeting. Fill in the meeting information and save as shown below:

# Employer Documents Checklist
Navigate to the Open Register and from the drop-down menu click the 'Employer Documents Checklist' link to open a window where all documents needed for employer enrollment are listed:
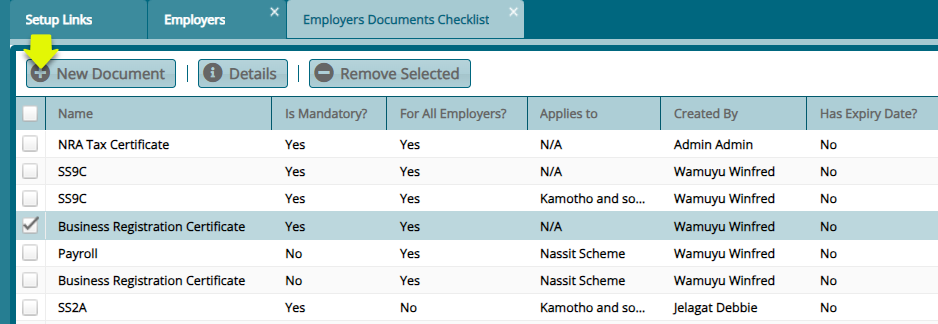
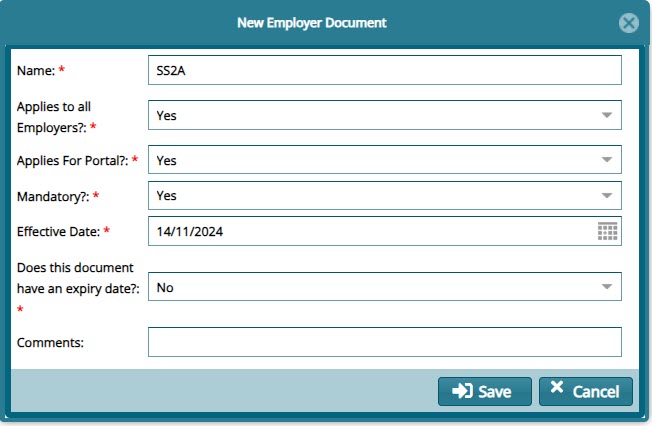
Clicking the 'New Document' button will open a dialog box for capturing the details for a new document as shown below:
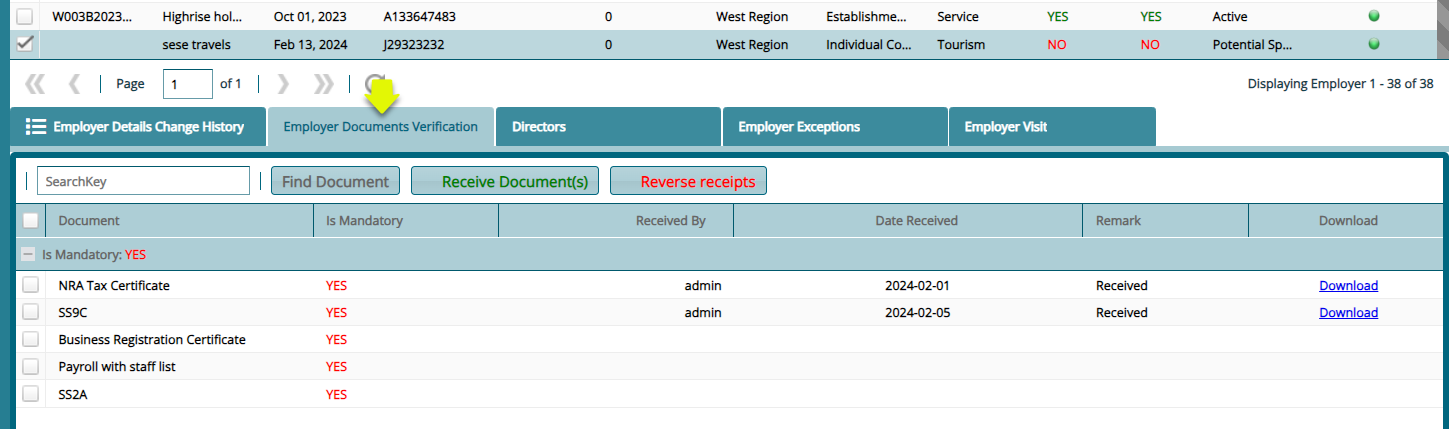
# Receiving Enrollment Documents
After a new employer has been created in the system, all the documents needed for registration need to be uploaded into the system. To upload the documents, follow the steps demonstrated in the following screenshot:
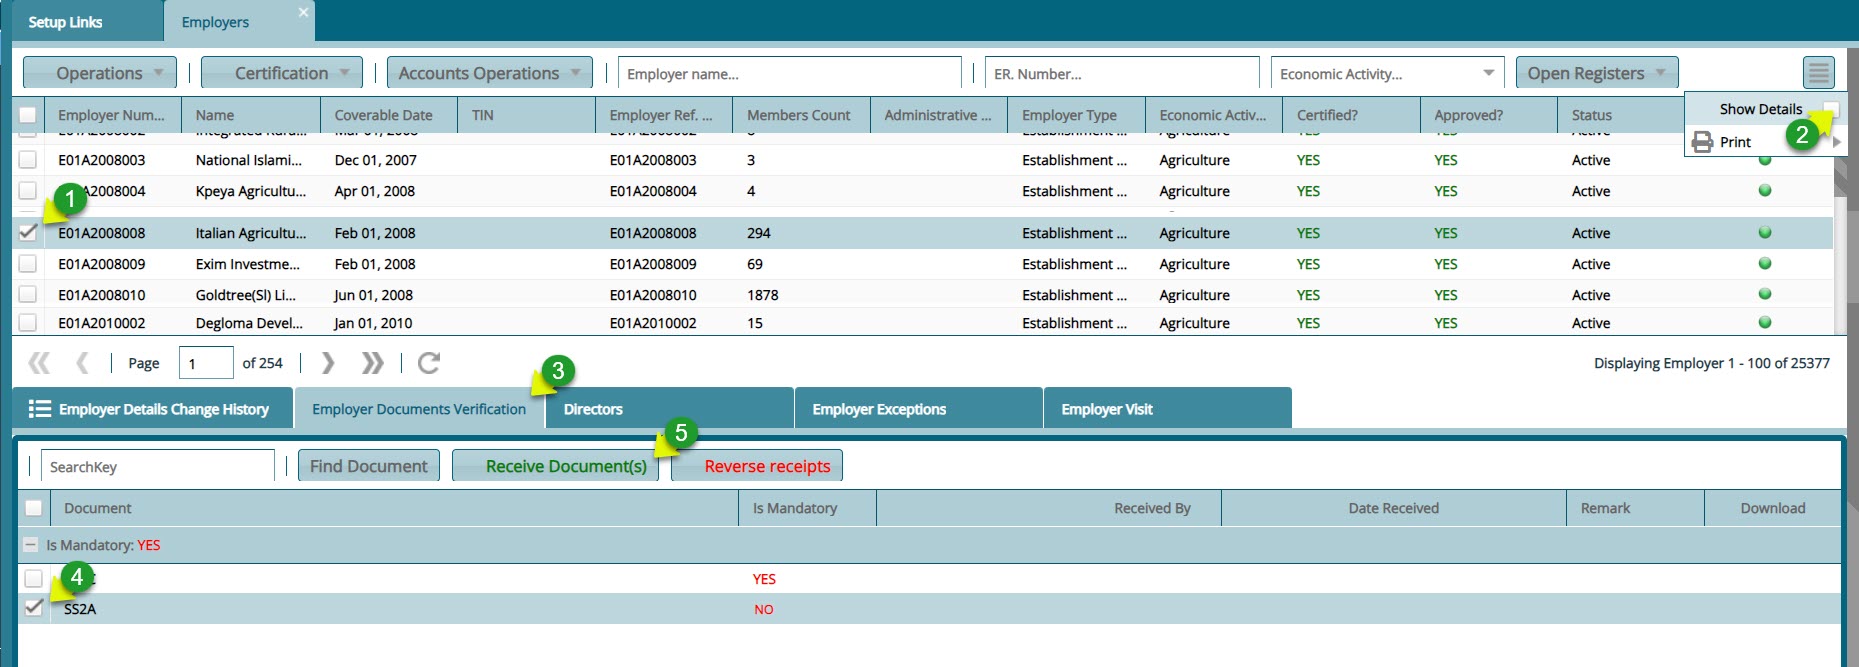
Action
Click label 1 to select the employer whose enrollment documents you want to receive.
Click label 2 checklist button to load a section on the lower side of the window showing the details of a selected employer.
Click label 3 tab to see the mandatory documents that need to be received.
Click label 4 checklist to select the document that needs to be uploaded.
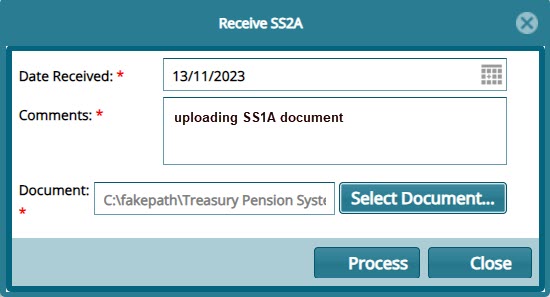
Click label 5 button to open a dialog box through which the document is uploaded to the system.
Clicking the 'Receive Documents' button, will open a dialog box for through which the required document is uploaded into the system as shown below:
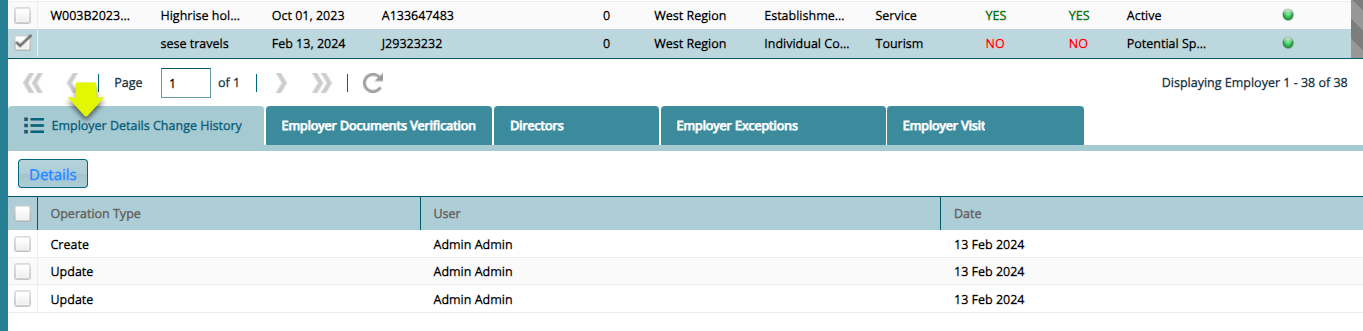
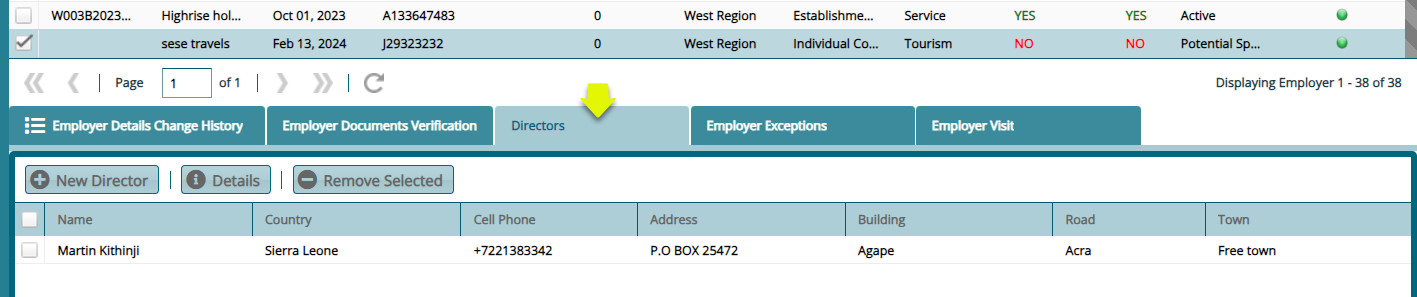
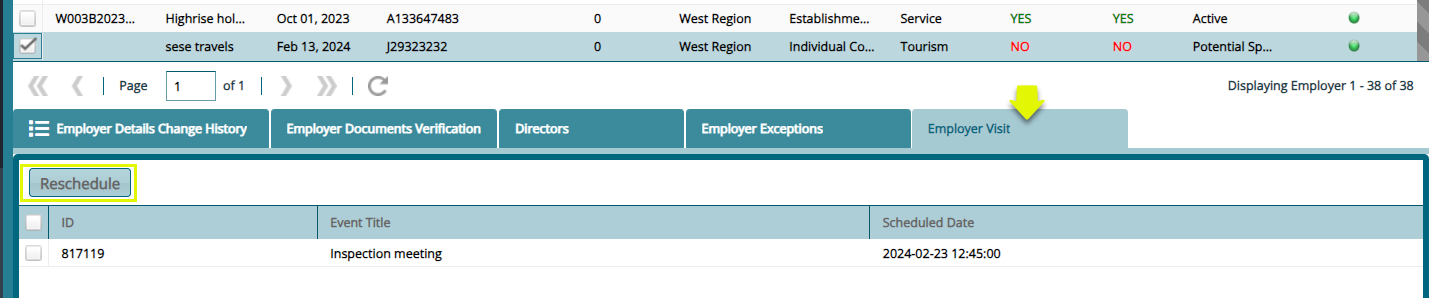
# Details Tabs
Employer Change History
Employer Documents Verification
Directors
Employer Exceptions

Schedule Employer Visit
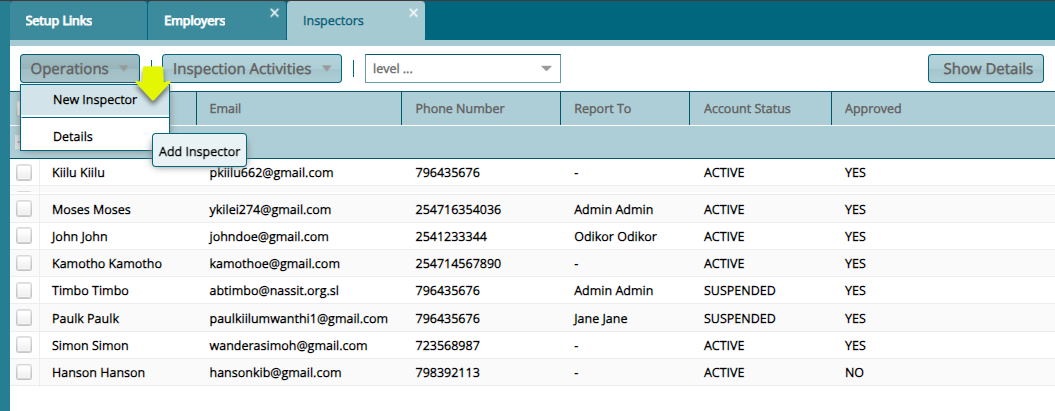
# Inspectors
To view the 'inspectors' listed in the system, navigate to the 'Open Register' and from the drop-down menu click the 'Inspectors' link to open a window where all Inspectors details are displayed.
Clicking the 'New Inspector' from the menu bar will open a dialog box for capturing the details for a new Inspector as shown below:
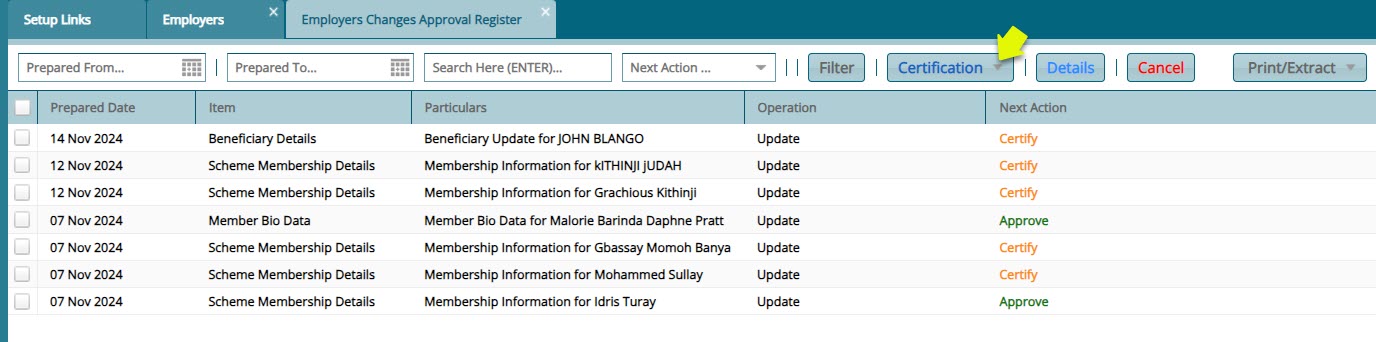
# Employer Endorsements
To see all the scheme members who have been proposed for change in some of their details, navigate to the 'Open Register' and click the Employer Endorsements Register link to open a register where all the employees proposed for cchanges are liste. from the 'Certification' menu click to Certify and Authorize for the proposed changes to go through. See screenshot below:
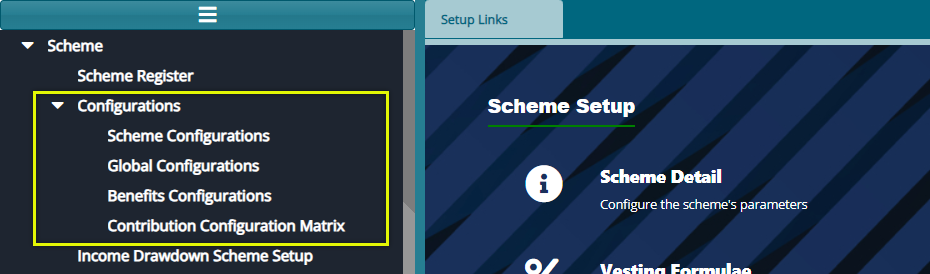
# Configurations
The 'Configurations' menu allows access to some of the key configurations that need to be set for the scheme to execute effectively. See the screenshot below:
# Scheme Configurations
The 'Scheme Configurations' are those that determine how a scheme is to be set up. Click the 'Scheme Configurations' menu link to open the 'Scheme Configurations' window set the required parameters for different subsets such as 'Basic Scheme Details', 'Members Configurations' among others as shown below:
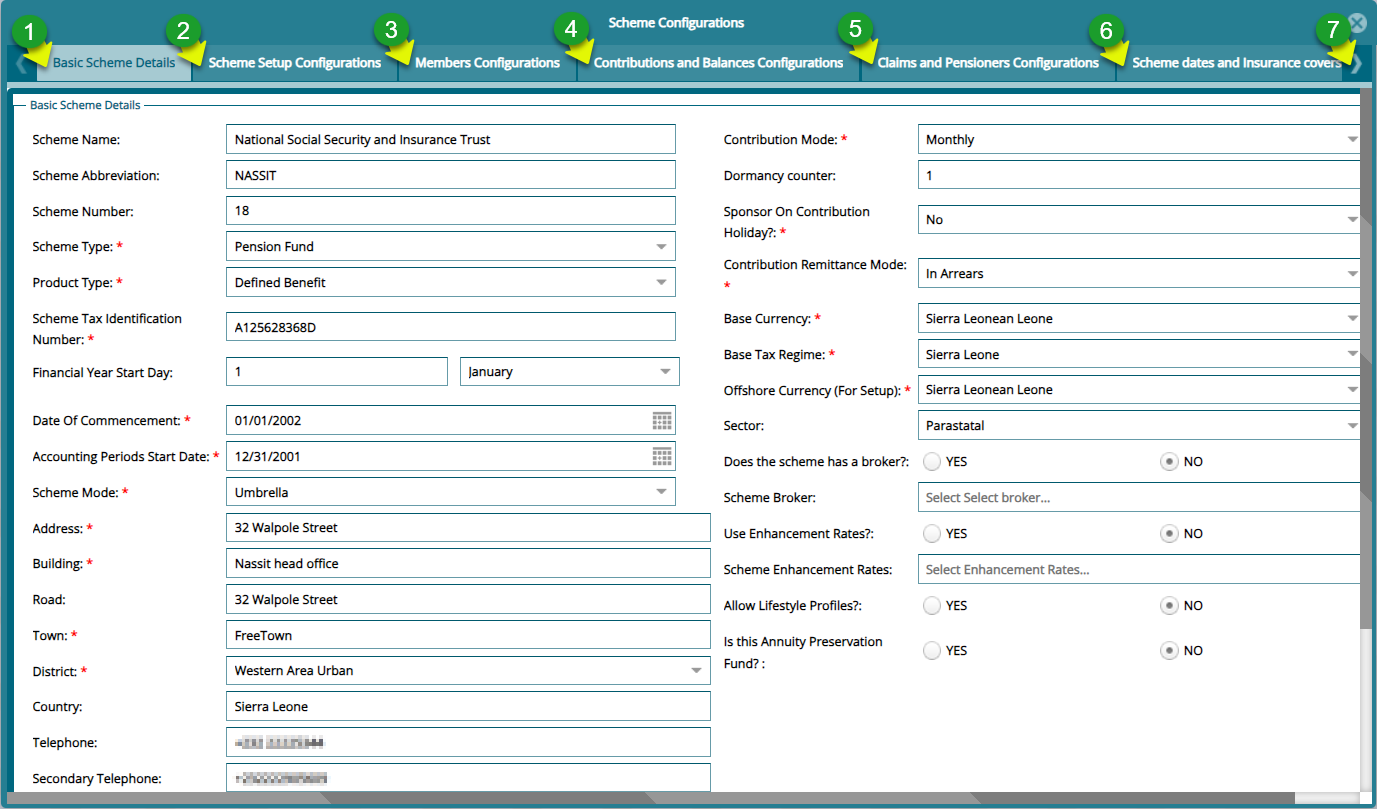
Action
Click label 1 tab to load the Basic Scheme Configurations window to set the appropriate parameters.
Click label 2 tab to load the Scheme Setup Configurations to set the appropriate parameters.
Click label 3 tab to load the Member Configurations to set the appropriate parameters.
Click label 4 tab to load the Contributions and Balances Configurations to set the appropriate parameters.
Click label 5 tab to load the Claims and Pensioners Configurations window to set the appropriate parameters.
Click label 6 tab to load the Scheme Dates and Insurance Covers Configurations window to set the appropriate parameters.
Click label 7 tab to access other configuration tabs.
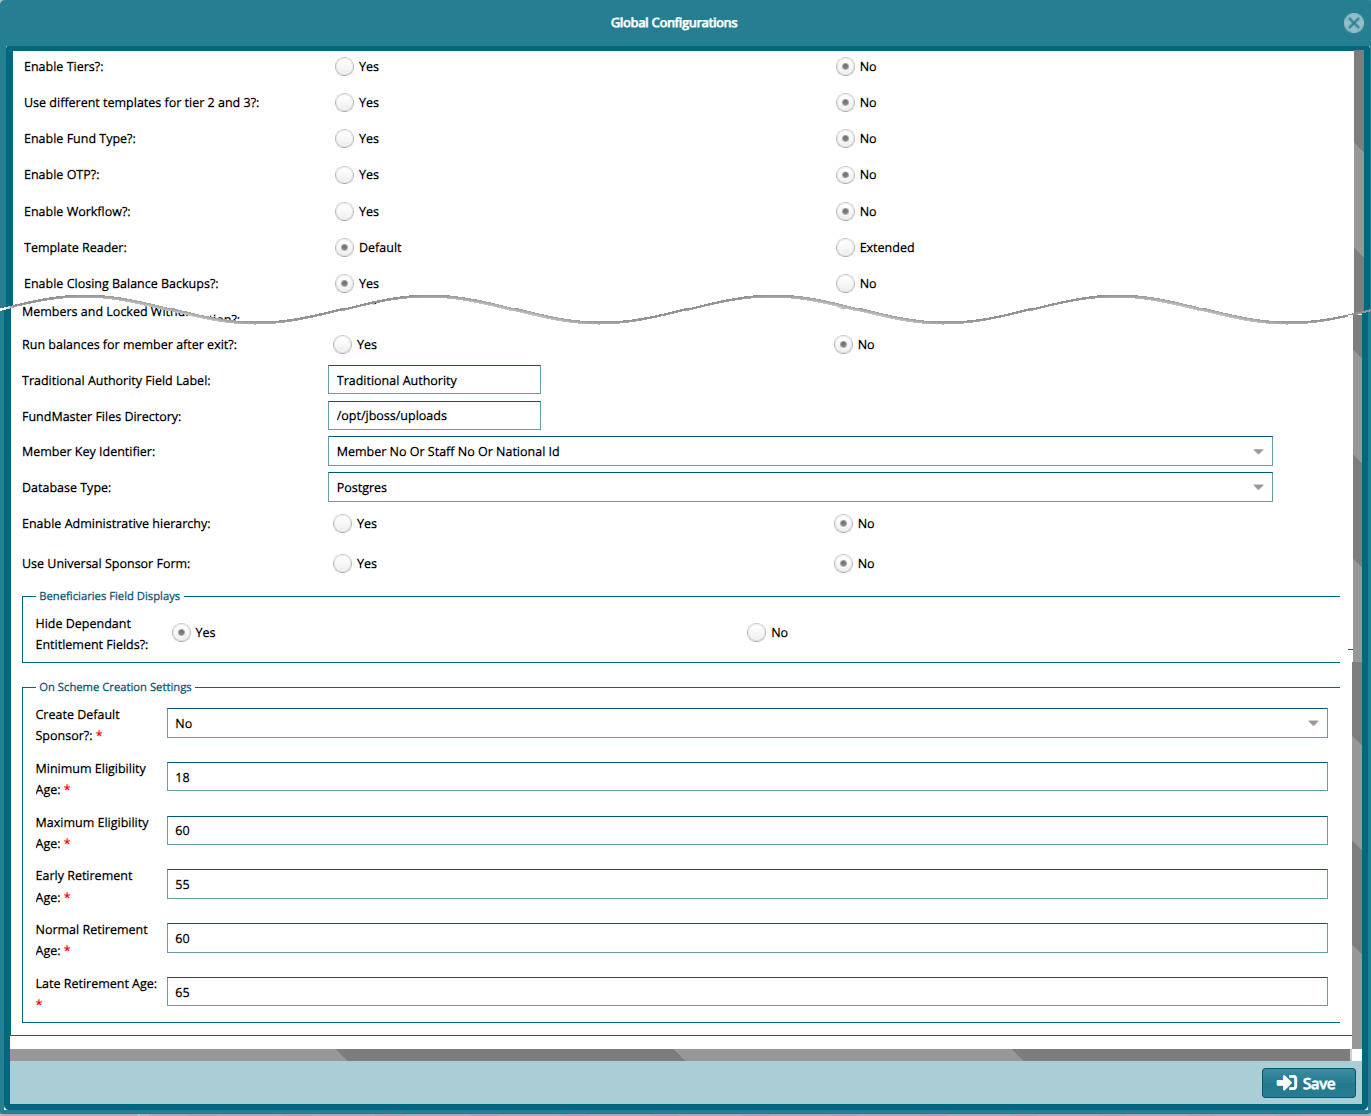
# Global Configurations
The 'Global Configurations' are set of parameters that affect all schemes in FundMaster when configured. Click the 'Global Configurations' menu link to open a configurations window and set the required parameters as shown below:
# Benefits Configurations
The 'Benefits Configurations' are those that determine members benefits are calculated at the point of exiting a scheme. Click the 'Benefits Configurations' menu link to open the configurations window to set the required parameters for different subsets such as 'Medical Configurations', 'Death Claim Configurations' among others as shown below:
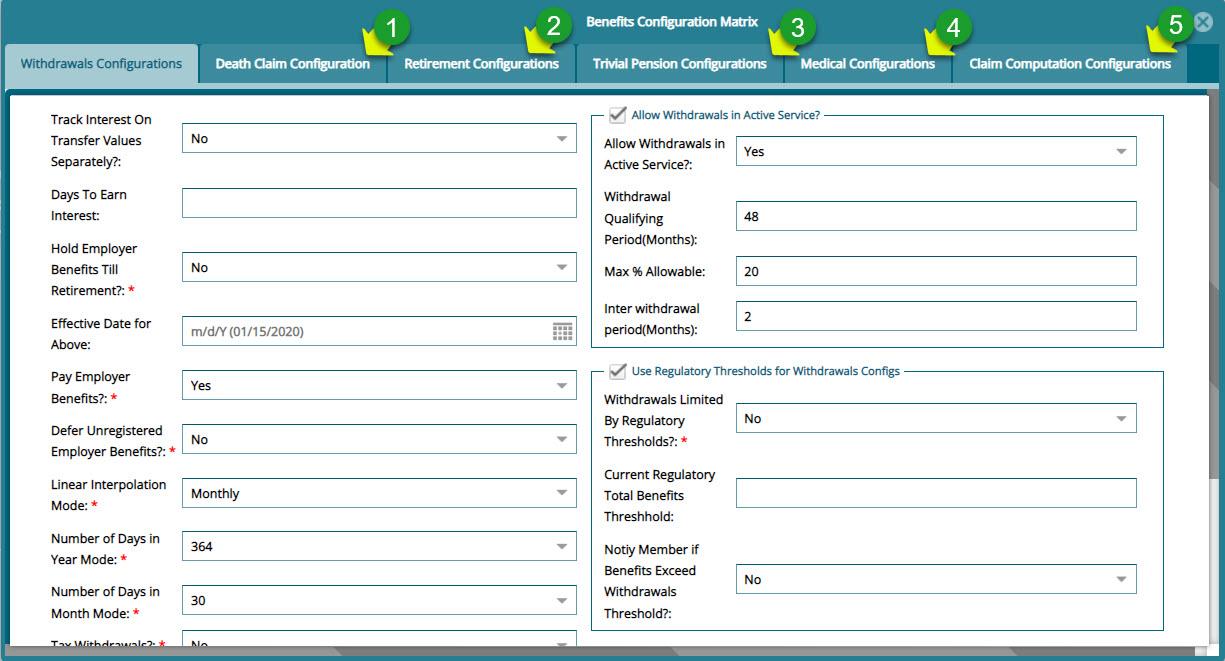
Action
Click label 1 tab to load a window for setting Death Claim Configurations parameters.
Click label 2 tab to load a window for setting Retirement Configurations parameters.
Click label 3 tab to load a window for setting Trivial Pension Configurations parameters.
Click label 4 tab to load a window for setting Medical Configurations parameters.
Click label 5 tab to load a window for setting Claims Computation Configurations parameters.
# Contribution Configuration Matrix
The 'Contribution Configuration Matrix' is a window where different sets of configurations related to a scheme members' contributions management are configured. Click the 'Contribution Configurations matrix' menu link to open the configurations window to set the required parameters for different sets such as 'Severance Due Entitlement', 'Contribution Refunds' among others as shown below:
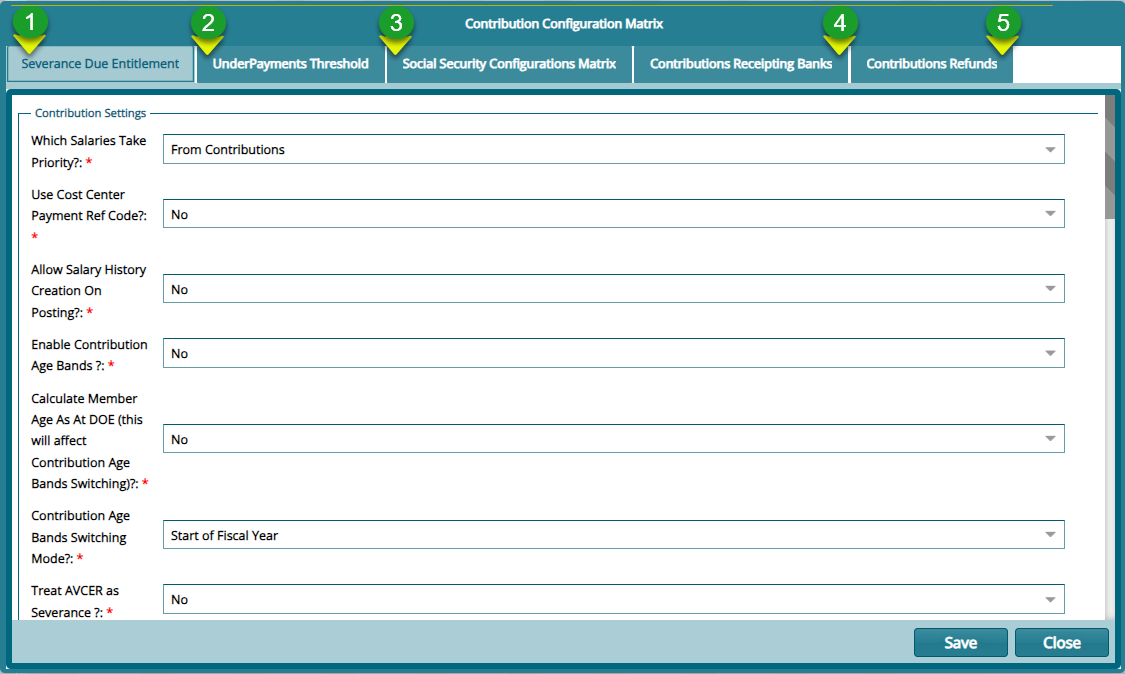
Action
Click label 1 tab to load a window for setting 'Severance Due Entitlement' parameters.
Click label 2 tab to load a window for setting 'Underpayments Threshold' parameters.
Click label 3 tab to load a window for setting 'Social Security Configurations' parameters.
Click label 4 tab to load a window for setting 'Contributions Receipting Bank' details.
Click label 5 tab to load a window for setting 'Contributions Refunds' parameters.
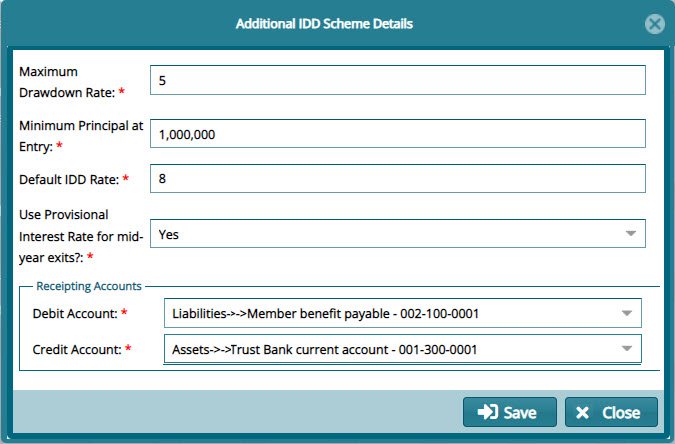
# Incomed Drawdown Scheme Setup
Clicking the 'Income Drawdown Scheme Setup' menu, shown below, will open the 'Additional IDD scheme'. See the dialog box in the next image.

Below is the 'Additional IDD scheme' dialog box for configuring IDD scheme details:
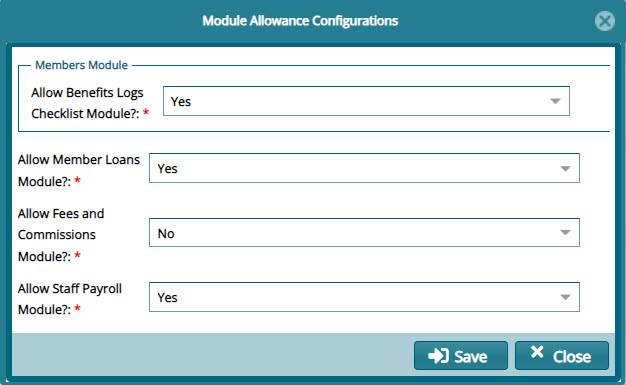
# Module Allowance Configurations
The set of configurations under the 'Module Allowance Configuration' menu, shown below, determine whether a scheme is allowed access to some extra modules.

Clicking the 'Module Allowance Configuration' menu will open a dialog box where the configurations are done as shown below:
# Districts, Regions, and Trustees Details
To capture the details pertaining a scheme's served districts, villages, regions, and the scheme trustees, click the respective menu items as shown in the screenshot below:

# Districts
The 'Districts' window facilitates the input of details pertaining to districts covered by a scheme, specifically in terms of membership. These details are captured as illustrated below:
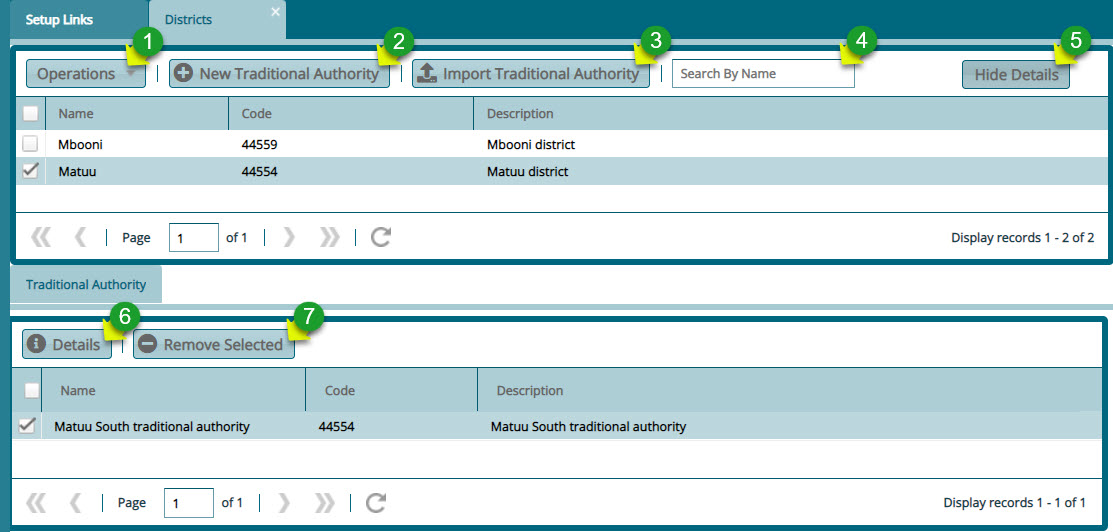
Action
Click label 1 menu button to display a drop-down list with links to create a new district, import districts in a template, viewing details of a selected district, or delete a selected district.
Click label 2 button to create a traditional authority within a selected district.
Click label 3 button to import, via a template, more than one traditional authority for a selected district.
Click label 4 search box to type and search a district by name.
Click label 5 button to hide or display the lower section of the window where traditional authorities in a district are listed.
Click label 6 button to view the details of a selected traditional authority
Click label 7 button to delete a selected traditional authority.
# Villages
The 'Villages' window facilitates the input of details pertaining to villages covered by a scheme, specifically in terms of membership. These details are captured as illustrated below:
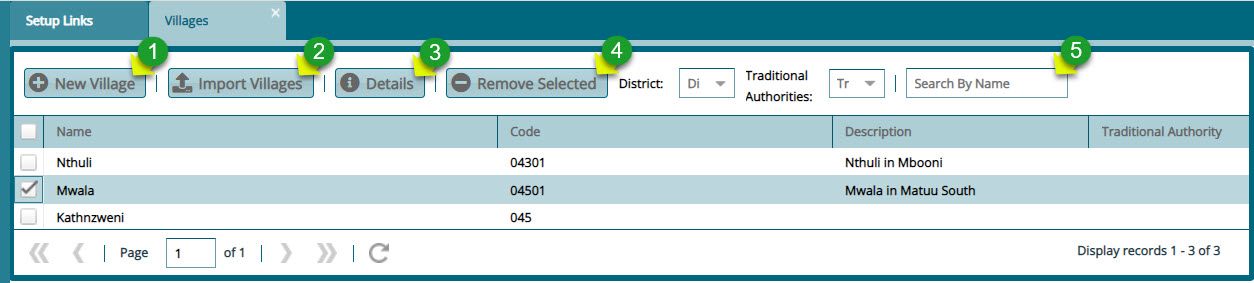
Action
Click label 1 button to capture the details of a new village.
Click label 2 button to import the details of more than one village via a template.
Click label 3 button to view the details of a selected village from the list.
Click label 4 button to delete a selected village from the list.
Click label 5 button to filter a village by name from the list.
# Regions
The 'Regions' window facilitates the input of details pertaining to regions covered by a scheme, specifically in terms of membership. These details are captured as illustrated below:

Action
Click label 1 button to display a drop-down list where links to trigger the processes of creating a new region, viewing details of a selected region, or deleting one from the list are located.
Click label 2 search box to type and search a region by name.
Click label 3 button to hide or display the lower section of the window where subregions are listed.
Click label 4 search box to filter a subregion by name.
# Trustees
The 'Trustees' window shows the records with the scheme trustees. From this window, new trustees can be added to the system. see screenshot below:
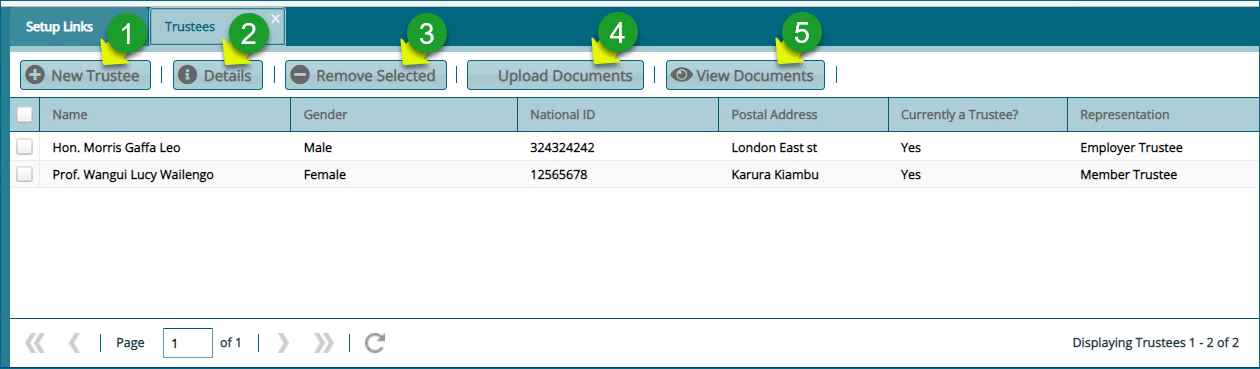
Action
Click label 1 button to capture a new trustee's details.
Click label 2 to view the details of a trustee selected from the list.
Click label 3 to delete selected trustees from the list.
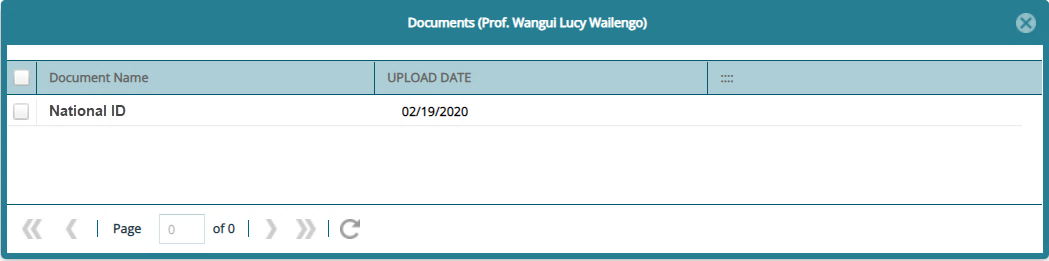
Click label 4 to upload support documents for a selected trustee.
Click label 5 to view documents for a selected trustee.
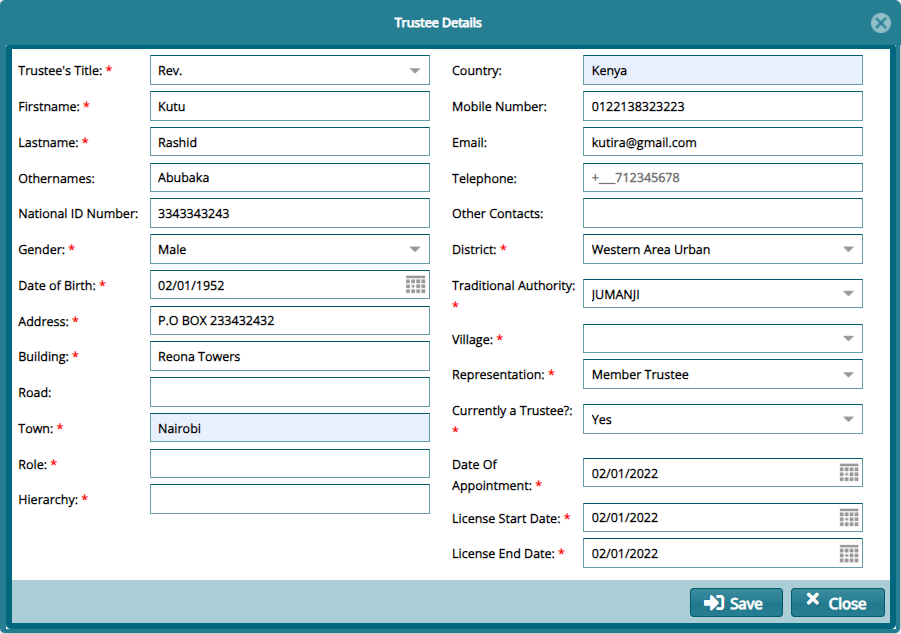
Clicking the 'New Trustee' button will open a dialog box for capturing the trustee's details as shown below:
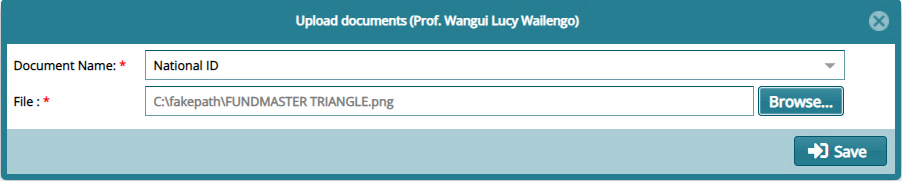
Clicking the 'Upload Document' button will open an upload window for selecting the type of document to upload to the system as shown below:
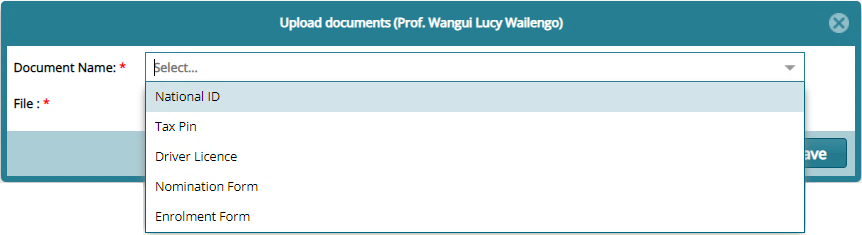
After selecting the type of document to upload, click the browse button to give a path for uploading a document from your device as shown below:
The window below shows a list of all uploaded documents:
# Member Class Specific Info
The configurations under 'Member Class Specific Info' inform how a member of a particular class in a scheme is treated apart from a member from another class under the same employer. See screenshot below:

# Contribution Age Bands
To set contribution Age, click the 'Contribution Age Bands' link and then click the 'New Contribution Age Band' button to add a new Age band as shown below:
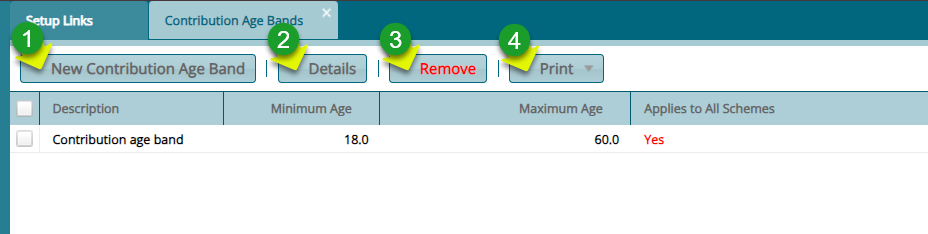
Action
Click label 1 button to load a dialog box to set age band configuration.
Click label 2 button to view the details of a selected record on the list.
Click label 3 button to remove a selected configuration.
Click label 4 button to view a print format copy of the Contribution age Band details.
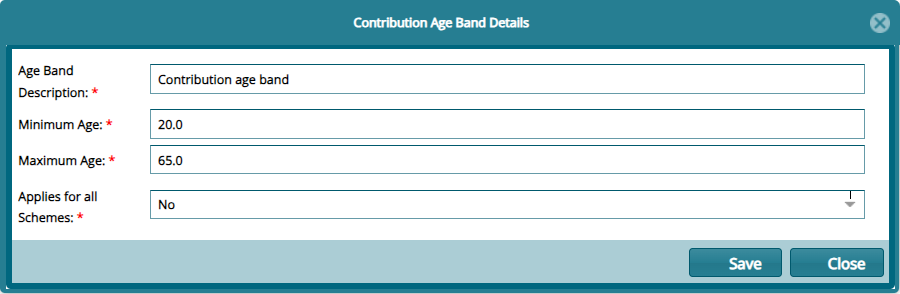
# New Contribution Age Band
Click the 'New Contribution Age Band' button labelled 1, to load a Contribution Age Band Details dialog box through which a new age band can be configured as shown below:
# Contribution Rates
To set contribution rates, click the 'Contribution Rates' link and then click the 'New Contribution Rates' button to add a new rate as shown below:

Action
Click label 1 button to load a dialog box and set a new configuration.
Click label 2 button to open a window for uploading contribution rates in a batch.
Click label 3 button to view the details of a selected record on the list.
Click label 4 button to remove a selected configuration from the list.
Click label 5 button to search records based on the Sponsor (employer)
Click label 6 button to Certify, Approve and Authorize a selected record.
Click label 7 button to view a print copy of the Contribution Rates details.
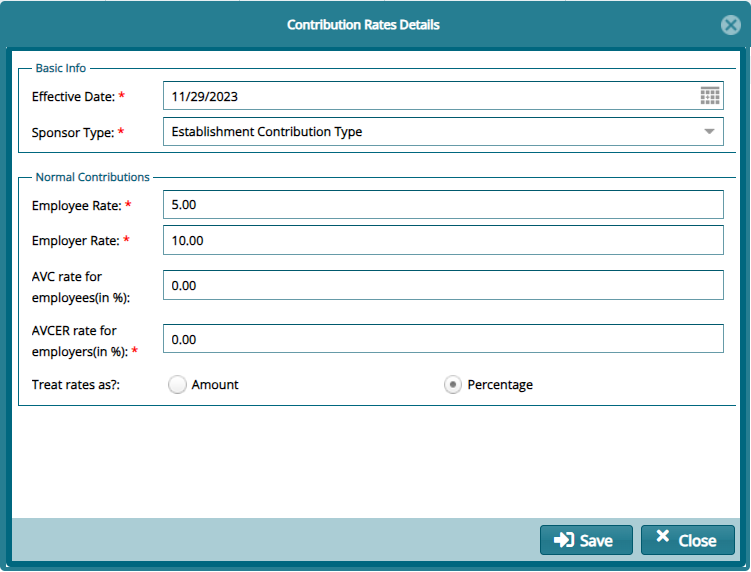
# New Contribution Rates
Click the 'New Contribution Rates' button labelled 1, to load a Contribution Rates Details dialog box through which a new Rate can be configured as shown below:
# Retirement Ages
The 'Retirement Ages' configurations are set to categorize the different types of retirement exits. This determines the benefits of a retiree under each category during benefits processing. The following screenshot shows a window displaying the already configured retirement ages:
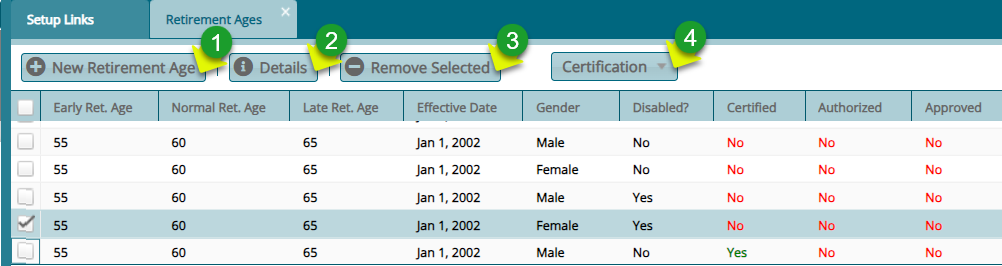
Action
Click label 1 button to configure a new retirement age.
Click label 2 button to view the details of a selected record.
Click label 3 button to delete a selected configuration from the records.
Click label 4 button to certify, approve and authorize a selected record.
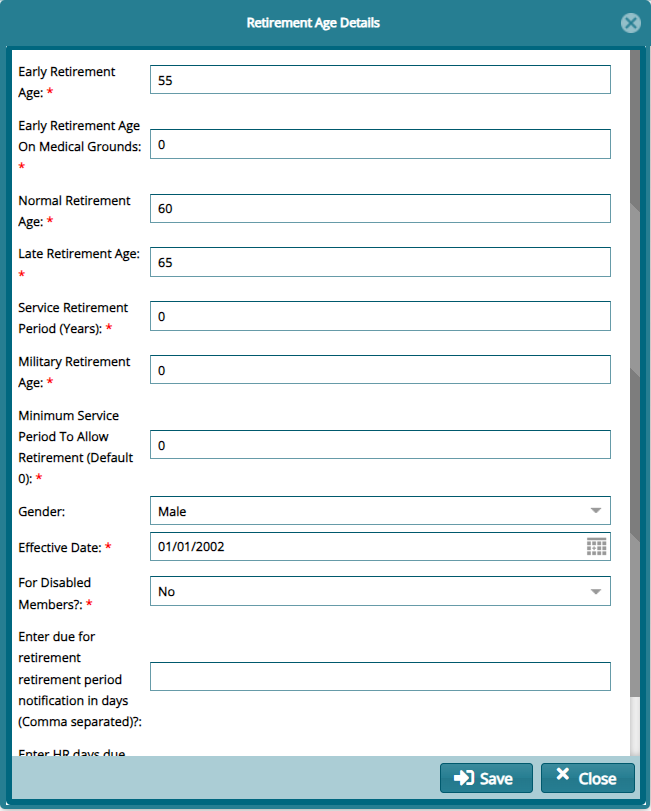
# New Retirement Age
Click the 'New Retirement Age' button to open a dialog box. Fill in the details to create a new retirement age as shown below:
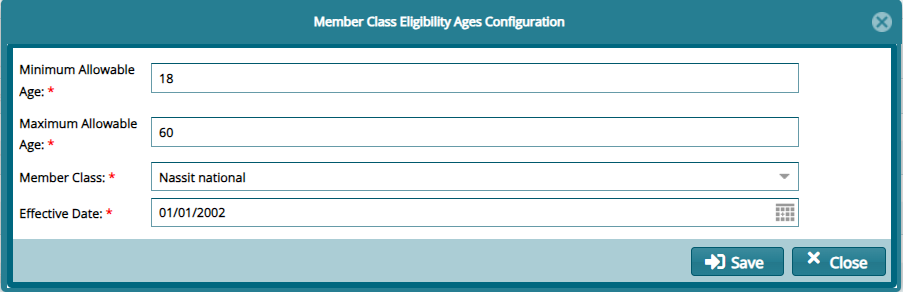
# Eligible Ages
The 'Eligibility Age' is a configuration set to determine who can be allowed in a member class in terms of age limits as shown below:
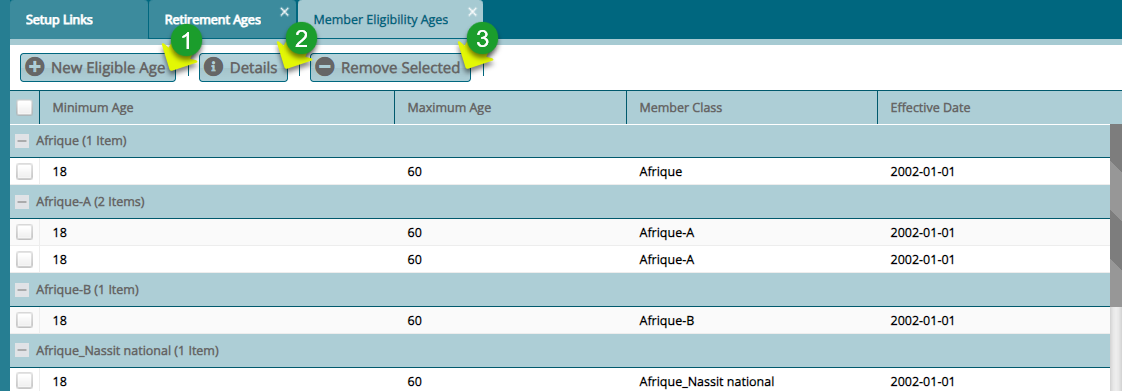
Action
Click label 1 button to set a new eligible age.
Click label 2 button to view the details of a selected record.
Click label 3 button to delete a selected record.
# New Eligible Age
Click the 'New Eligible Age' button to open a dialog box. Fill in the details to create a new eligible age as shown below: